Let’s talk minimal cash and all creativity. Holidays can be costly, and possibly dangerous — as it nears the holidays and the mall suddenly becomes the setting for the 76th annual Hunger Games.
The Gallup Poll estimates the average American will spend $786 on gifts this year, which is not far off trend from past years. The top 26 percent will spend at least $1,000 on presents under the tree and 50 percent plan to throw down at least $500.
According to the poll, 3 percent will spend less than $100 — but there’s no shame in being thrifty. This year, say no to big spending and insincere gifts. Forgo the generic scented candles and meaningless gift cards.
These easy DIY projects will save money and make the season mean so much more than a price tag.
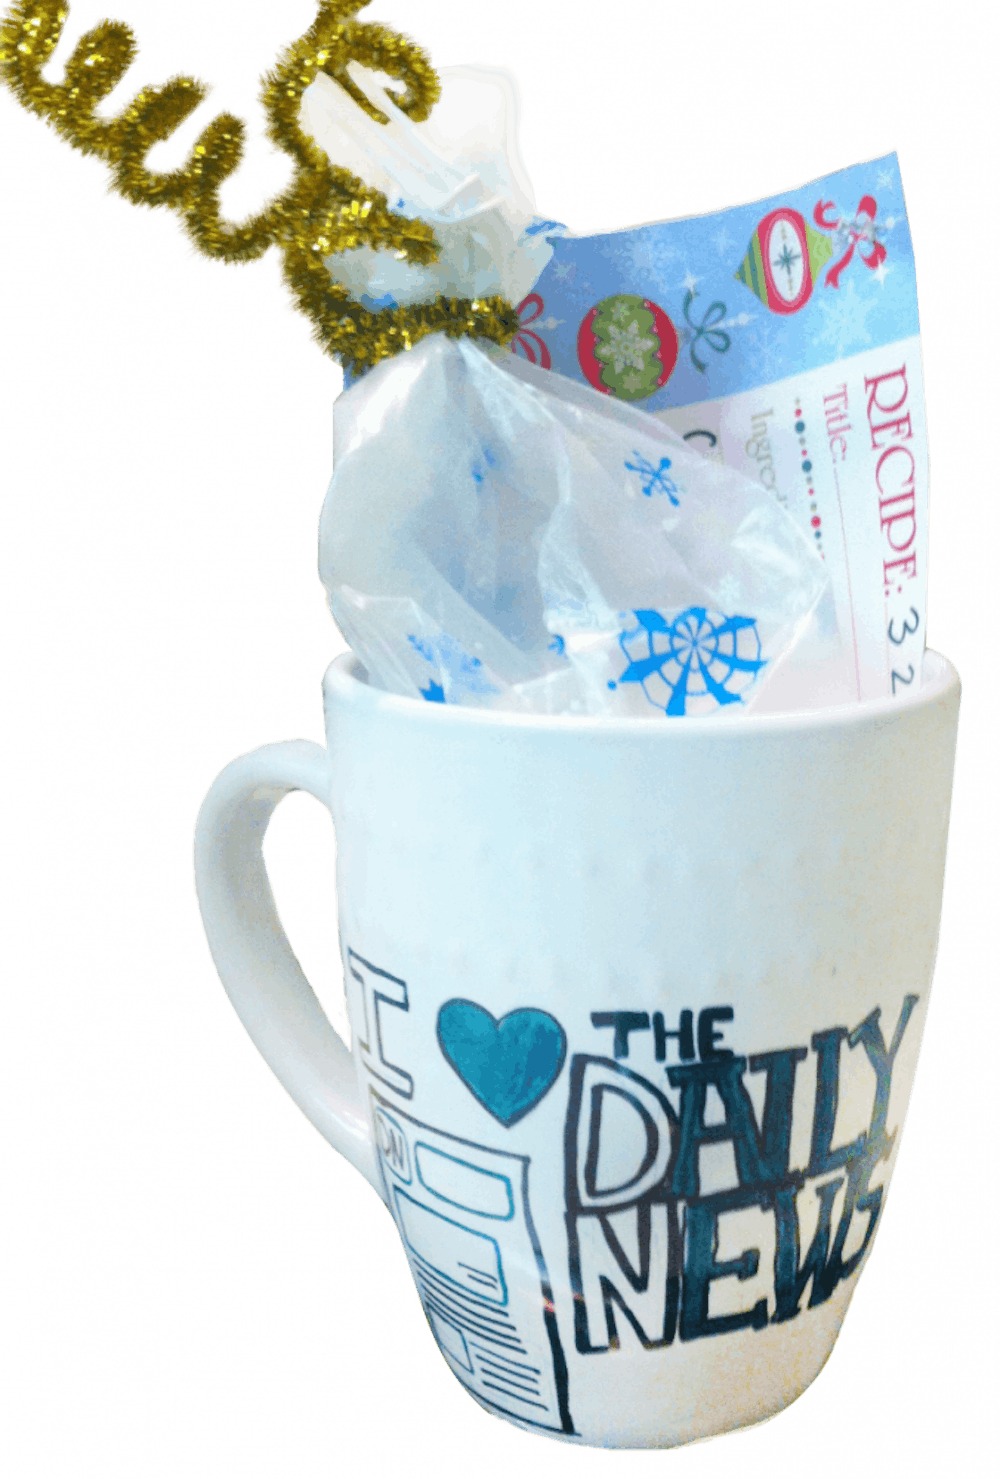
PERSONALIZED MUG AS EASY AS 1, 2, 3
This is perfect for anyone from college buddies to grandparents. Transform a plain, cheap mug into a permanent work of art with minimal effort. Then add a bag of 3-2-1 Magic Mug Cake mix and a recipe card.
MATERIAL:
• One plain ceramic mug
• Sharpie markers
• Oven
• Gift bag
• Recipe card
• One Angel food cake mix
• One cake mix of your choice
MUG:
1. Don’t spring for the Martha Stewart collection. Find a plain, cheap mug like the $1 white one in the example. Make sure it’s clean and dry.
2. Next, get permanent markers — stay away from generic brands that will discolor and may fade. Then just draw with the markers on the outside of the mug. If you aren’t artistically gifted, use lettering and design stencils. Personalize the mug with embellished names, caricatures, doodles or write a letter for the recipient. Trace over the design a few times over to make sure the design won’t fade.
Tip: If you mess up, use a Q-tip and rubbing alcohol to erase mistakes.
3. Let the mug dry for 24 hours.
4. Then preheat your oven to 375°F and put in your mug for 30 minutes. Don’t take it out right after the timer dings. Wait until the oven is cool or the mug may crack from the quick temperature change.
5. Once the mug is cool, test it by washing it. If the color washes out or runs, you can trace over the image again and bake it a second time.
3-2-1 Magic Mug Cake mix
1. Mix together equal parts of the dry Angel food cake mix and any cake mix of your choosing.
2. Then measure out 15 tablespoons into a gift bag and tie it shut — this will make five servings.
3. Set it inside the mug and write the recipe on a card to slip in next to the mix. The recipe is to mix 3 tablespoons of cake mix and 2 tablespoons of water in the mug, then microwave for a minute.
LOVE IN A JAR

MATERIAL:
• Ball jar (with lid)
• Scrap pieces of fabric, burlap and ribbon
• Hot-glue gun
Optional:
• Decorative flowers
• Jewels
1. Decorate the jar to fit the personality or house decor of the gift receiver. If the person is an over-the-top flower, ruffles and patterns lover, go big or go home. Use pieces of burlap to wrap around the entire jar and glue. Glue flowers or bows on the front, and then add a bigger square piece of fabric to the top before putting on the lid. If the person likes muted colors, wrap burlap around the jar and glue, but skip the frou-frou. Instead, tie a small bow directly below the lid, so it looks more like a present.
2. Fill the jar. For the sentimental parent — and the broke college student — fill the jar with the reasons you love them. List the reasons on cut-up pieces of paper as a reminder that you’re thankful for their support. Also, try encouraging quotes.
3. If you have extra cash, fill the cup with small gifts. For the coffee lover, fill the jar with Keurig’s K-cups, coffee beans or mini coffee creamers. Tea bags, hot chocolate mix and marshmallows also would work.
HOMEMADE HAND SCRUB

MATERIAL:
• 12 ounce Ball jar (with lid)
• Domino Sugar (any brand will do)
• Dawn Hand Renewal with Olay Beauty (the example uses pink)
• Stirring utensil
• Ribbon of choice
1. Pour the sugar in the jar, about two-thirds full.
2. Next, squeeze the soap in until it has reached the bottom of the mouth of the jar.
3. Then, take some type of stirring utensil and stir until it is thick.
Note: Make sure the mixture is thick, not runny. This will allow the mixture to be more exfoliating than soapy. If need be, add more soap or sugar. It should be a light, baby pink when it’s fully mixed.
4. Lastly, put the lid on tight and tie a nice ribbon around the top. Note: No gift wrap needed, the gift looks adorable on its own.
SWANTS
There is nothing cooler than taking old clothes and repurposing them into something equally cool, if not cooler. So when people on the Internet started turning old sweaters into an awesome trendy pair of sweat pants, I immediately needed a pair. Everyone else needs a pair too, so make your friends, family and pets some “swants.”
MATERIAL:
• One old sweater (Check out thrift stores for old wool sweaters on the cheap)
• Needle and thread
• Scissors
• Ruler
1. Take off your pants, and slip both legs into the armholes of the sweater. Make sure everything fits. As you stand, it should look as if a headless man is doing a handstand. If you feel the sweater fits appropriately, then take it off and grab some scissors.
2. Then cut off the neck of the sweater. Starting at the edge of the neck seam, cut directly down six inches in the front and eight inches in the back. You’ll need the extra room in the back for your booty. Afterwards, connect the shoulder seams together and sew two inches to the left and two inches to the right. A total of four inches across should be sewn.
3. Next, put the sweater back on. It’s going to look very sad, droopy and confusing. All of the tutorials instructed swant designers to “origami” the pants into a cool fashion and finish it up by sewing the pants together.
Read More

The local artist behind The Cup’s alien-like art
By Abigail Denault / April 8, 2024The Cup’s patrons might take their beverage into the seating area to the tune of an indie-alternative song and like Jessica Wolfe, a 2023 graduate of Ball State University, they might notice new additions to the walls since their last visit.
4 ways to help customer service workers
By Hannah Amos / December 18, 2023With the holiday season coming up, here are 4 ways to improve the treatment of customer service workers

Desire to be different: Students embrace quirks
By Alex Kincaid / January 12, 2016They ignore the status quo or walk around in costume, not seeming to care that they’re different than those around them. These students who choose not to conform to societal norms say they do it for a variety of reasons — because they feel like it, it garners attention or it boosts their confidence.