Emily Griffis is a senior literature and creative writing major and writes DIYs for The Daily News. Her views do not necessarily agree with those of the newspaper or The Daily. Write to Emily at epgriffis@bsu.edu.
It’s doesn’t seem like summer until you’ve planted a flower, but attractive flower pots can be expensive, and for those of us that aren’t savvy with a paintbrush, DIY options can be limited. These decorated flower pots use fabric, allowing them to be tailored to your own personal taste on a dime.
What you’ll need:
| Fabric | Scissors | Clay pots | Paintbrush |
|---|---|---|---|
| Flowers | Modge Podge | Potting soil |
Step 1:
Cut your fabric in arc-like shapes, thick enough that there is a little extra to fold over the tops and bottoms of your pots. The arc shape will make it easier for you to wrap your pot without the fabric bunching up and making bumps on your finished product.
Step 2:
Using your paintbrush, spread a strong, liquid glue on the outside of your pot, smoothing your fabric across it as you go. I used Modge Podge, which can be found at any craft store. Make sure you press the fabric down firmly on all surfaces of the pot to prevent any bubbles popping up.
Step 3:
Flip the pot on its top and use your paintbrush and Modge Podge to glue down the extra fabric on the bottom. You’ll need to cut slits in the fabric periodically to keep it from bunching up as it wraps around the round bottom.
*Note: Make sure the fabric doesn’t cover the drain slots in the bottom of the pot.
Step 4:
Flip the pot over and do the same thing with the extra fabric around the top. Make sure it is long enough so that the end is covered by dirt once it is wrapped over the lip of the pot. Once again, you’ll need to cut slits in the fabric periodically to avoid bunching up the fabric.
Step 5:
Cover the outside of your finished pot in a liquid finish, making sure to get every inch of fabric. If you used Modge Podge for a glue, this also doubles as a finish. If you didn’t use Modge Podge, make sure whatever alternate finish you find says “dries clear” somewhere on the bottle.
*Note: Your type of finish depends on where you plan to keep your pots. If you want them inside, any finish will do (Modge Podge Matte). If you want to keep them outside, they need to be waterproof and weather resistant. A great finish for this is Modge Podge Hard Coat. It is water resistant, but can take up to four weeks to cure. This means it cannot come into contact with any water before the time is up.
Step 6:
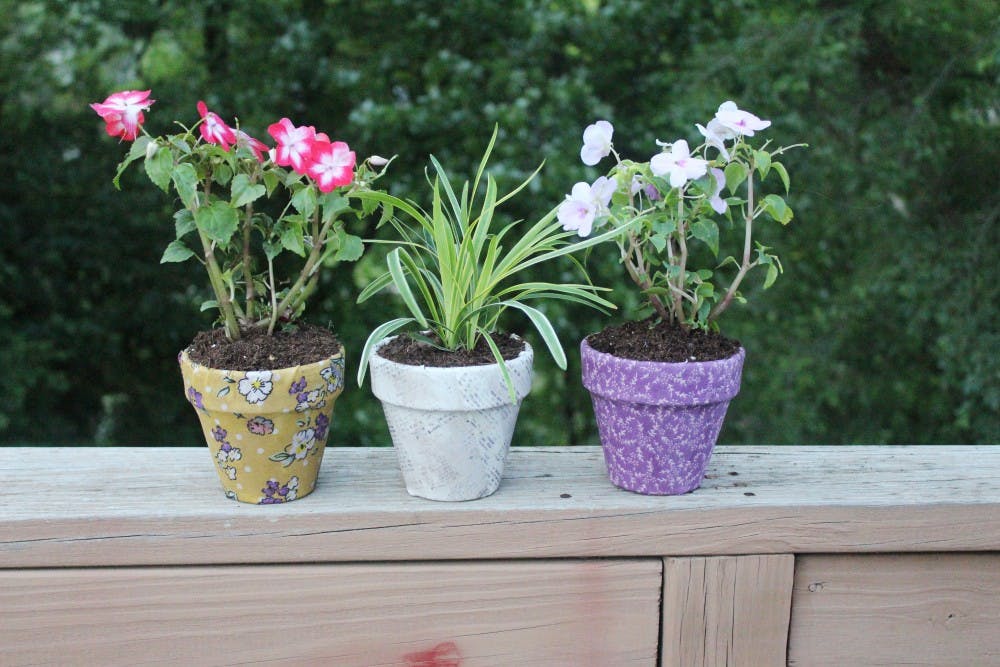
Plant your flowers. Display. Admire.
Read More

Center for Peace offers academic opportunities
By Meghan Braddy and Grayson Joslin / 14 hours agoOver the years, the center has offered a peace studies minor, conflict resolution training and grant funding.

AP: New York appeals court overturns Harvey Weinstein’s 2020 conviction
By Staff Reports / 15 hours agoNew York’s highest court on Thursday overturned Harvey Weinstein’s 2020 rape conviction, finding the judge at the landmark #MeToo trial prejudiced the ex-movie mogul with “egregious” improper rulings, including a decision to let women testify about allegations that weren’t part of the case, according to the Associated Press (AP).

AP: Hamas willing to enact ceasefire if an independent Palestinian state is established
By Staff Reports / 15 hours agoWednesday, April 24th, a top Hamas political official said the group is willing to agree to a truce of five years or more with Israel and that it would lay down its weapons and convert into a political party if an independent Palestinian state is established along pre-1967 borders, according to the Associated Press (AP).