Now that autumn is here, with it comes cool weather, pumpkin-flavored foods and colorful leaves. Rather than crunching leaves under your boots as you walk to class, consider picking up a few and taking them home with you. Then, try out these do-it-yourself ways to paint these leaves to get into the spirit of the upcoming fall holidays.
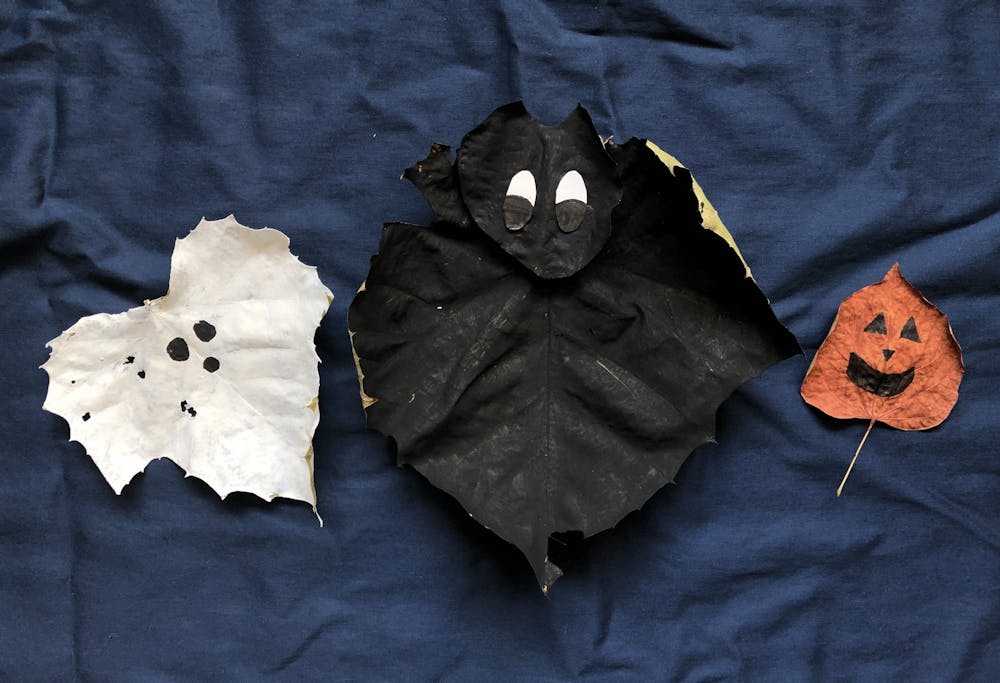
Levitating Ghost Leaf

What you need:
A leaf with three points
White paint
Paintbrush
Black marker
Scissors
Directions:
Smooth out the leaf so you have an even painting surface.
On one side of the leaf, paint the entire side of the leaf with white paint. Tip: hold the stem of the leaf as you paint to keep your fingers clean.
Let dry completely.
Repeat steps 2-3 until the leaf’s original color no longer shows through the white paint.
Position your leaf so the leaf’s stem is facing away from you.
One inch away from the leaf’s stem, use your black marker to draw your ghost’s face. Draw two dots for its eyes and one dot for its mouth.
Cut the stem off of the leaf if desired.
Enjoy your flying ghost leaf.
Jack-o’-lantern Leaf

What you need:
A small round leaf
Orange, red and brown paint
Paintbrush
Black marker
Scissors
Directions:
Smooth out the leaf so you have an even painting surface.
On one side of your leaf, paint the entire side of the leaf in brown paint. Tip: hold the stem of the leaf as you paint to keep your fingers clean.
Let dry completely.
Repeat steps 2-3 until you reach your desired color for your jack-o’-lantern.
Position your leaf so the leaf’s stem is facing toward you.
In the center of your leaf, draw your jack-o’-lantern’s face, including eyes, nose and mouth.
Cut the stem off of the leaf if desired.
Enjoy your jack-o’-lantern leaf.
Flying Bat Leaf

What you need:
Large leaf
Small leaf
Black paint
Paper plate
Black marker
Scissors
Glue or tape
Directions:
Smooth out the leaf so you have an even painting surface.
On one side of the leaf, paint the entire side of the leaf with black paint. Tip: hold the stem of the leaf as you paint to keep your fingers clean.
Let dry completely.
Repeat steps 2-3 until the leaf’s original color no longer shows through the black paint. This will be your bat’s body.
Taking your small leaf, cut out a heart shape for the head of your bat. This will be your bat’s face.
Paint your heart-shaped leaf cutout with black paint.
Let dry completely.
Repeat steps 6-7 until the leaf’s original color no longer shows through the black paint.
With your paper plate, cut out two long oval shapes. These will be your bat’s eyes.
Using your black marker, color in the lower half of the ovals to create the eye’s pupils.
Take your black heart-shaped leaf cutout and position it so the heart’s point is facing toward you.
With glue or tape, attach the eye’s onto the bat’s face in the center of the heart-shaped leaf cutout.
Take your black large leaf and position it so the leaf’s stem is facing away from you.
With your back heart-shaped leaf, glue or tape it just below the leaf’s stem to attach the bat’s face onto its body.
Cut the stem off of the leaf.
Enjoy your flying bat leaf.
Contact Nicole Thomas with comments nrthomas3@bsu.edu or on Twitter @nicolerthomas22.
Read More

Indiana Capital Chronicle: Digital grant program halted by Trump administration, state says
By Indiana Capital Chronicle / 18 hours agoIndiana is suspending the application period for a Digital Opportunity Grant program, which opened April 30, under orders from President Donald Trump’s administration.

Ball State ends 2025 season with loss to Miami in MAC Softball Championship semifinal
By Zach Carter / 2 days agoBall State ended the year with a 8-0 loss to Miami.

Cardinals elect a new pope, the first American pope in history
By Staff Reports / 4 days agoCardinal Robert Prevost, an American missionary who spent his career ministering in Peru and leads the Vatican’s powerful office of bishops, was elected the first American pope in the 2,000-year history of the Catholic Church, according to the Associated Press (AP).