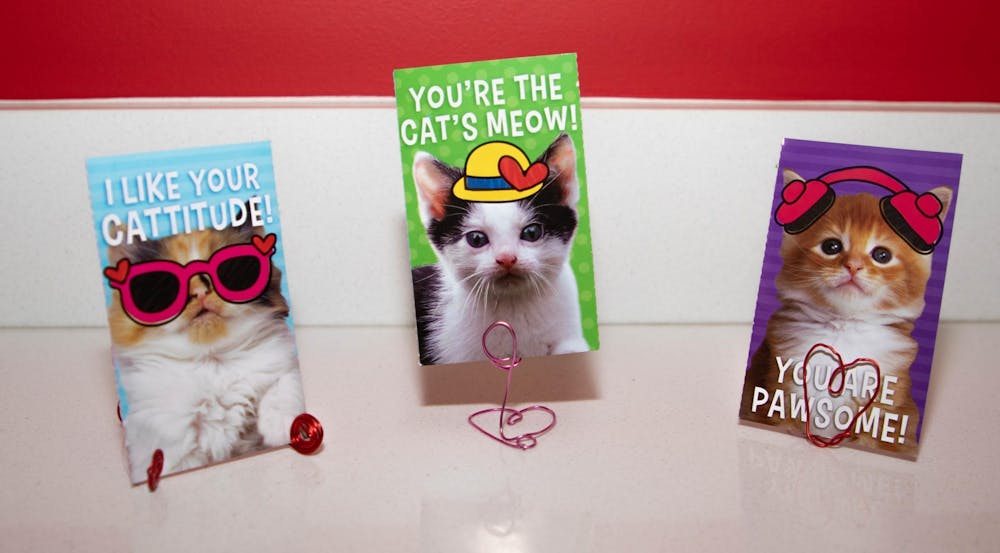
Valentine’s Day is quickly approaching, and alongside the chocolates and roses, people often receive heartfelt messages written inside Valentine’s Day cards. Each year, approximately 145 million Valentine’s Day cards are exchanged around the world, according to Hallmark. Instead of hiding these cards away or tossing them in the trash, consider making these four do-it-yourself greeting card displays to share the love with others.

Classic Card Stand
What you need:
- Colorful copper wire
- Scissors
Directions:
- Cut the copper wire to your desired length, taking into consideration the size of your Valentine’s Day card.
- Lay the copper wire out flat in a straight, horizontal line.
- Beginning at one end of the wire, start to roll the wire in on itself in a circular motion. This should begin to form a flat spiral.
- Continue rolling the wire until you have made a spiral of your desired size.
- Repeat this process on the opposite end of the wire.
- Once both of your spirals are complete, take either end of the wire, and cross them over one another, creating a large loop in the middle of the wire.
- Bend the loop backward so the top of the loop is even with the spirals. This should create a type of pyramid structure that stands on its own.
- Place your card behind the spirals, rest it against your copper structure and display your card for all to see.

Stand with Heart Base
What you need:
- Colorful copper wire
- Scissors
Directions:
- Cut the copper wire to your desired length, taking into consideration the size of your Valentine’s Day card.
- Lay the copper wire flat in a straight, horizontal line.
- Starting with one end, twist the wire to create a heart shape. This heart will serve as the base of your display stand.
- Lay the heart flat on a surface, making sure it is resting evenly on every side.
- Keeping your heart base flat, bend your remaining wire so it is standing straight up.
- Twist the end of your remaining wire three to four times around the tip of your finger. These swirls will be the structure that holds your Valentine’s Day card in place.
- Stabilize your heart holder, making sure your heart base is even on the surface.
- Place your card in between two of the spirals on top.
- Enjoy your heart holder.

Heart Stand with Swirl Base
What you need:
- Colorful copper wire
- Scissors
Directions:
- Cut the copper wire to your desired length, taking into consideration the size of your Valentine’s Day card.
- Lay the copper wire flat in a straight, horizontal line.
- Starting from one end, beginning rolling the copper wire in on itself, leaving gaps between the wire as you create a wide, flat spiral. Roll about half of the length you cut. This will serve as the swirl base of your stand.
- Leaving the spiral base flat, fold the rest of the wire so it is sticking straight up.
- Twist some of the remaining wire into a circle about the size of a quarter. Repeat this once so you have two circles together.
- With your remaining wire, twist it into the shape of a heart. Your card will rest between this heart and the two circles you made behind it. Both the heart and the circles should be standing straight up.
- Once your heart is molded, rest your card between your heart and the two circles, pinching them together so they hold the card securely in place.
- Show off your homemade heart holder.

Heart Stand with Clay Base
What you need:
- Colorful copper wire
- Scissors
- Heart-shaped cookie cutter
- Plaster
Directions:
- Cut the copper wire to your desired length, taking into consideration the size of your Valentine’s Day card.
- Lay the copper wire flat in a straight, vertical line.
- Take the top of the copper wire, and shape it into a heart. Repeat this two to three times to make at least three overlapping hearts.
- Once you have finished molding your wire, start to prepare your plaster, following the instructions on the box.
- Place your heart-shaped cookie cutter on a paper or plastic plate, and pour your plaster mixture to the top of the cookie cutter, making sure to flatten the top of mixture as much as possible.
- Take your copper wire, and place the bottom in the center of the plaster mixture, standing straight up with your hearts on top. Stabilize the wire if necessary.
- Let the plaster mixture set for 30 to 40 minutes. Then, carefully remove the cookie cutter to prevent it from sticking to the plaster.
- Let the plaster mold sit for another 24 hours.
- Display your Valentine’s Day card for everyone to enjoy.
Contact Taylor Smith with comments at tnsmith6@bsu.edu or on Twitter @taynsmithh.
Read More

PHOTOS: Fourth of July 2025
By Staff Reports / 15 hours agoIndependence day in Muncie featured celebratory events at Minnetrista Museum and Gardens and Muncie Central Highschool.

Ball State adjusts 51 degree programs amid statewide enrollment mandate
By Trinity Rea / YesterdayIn a statement to The Ball State Daily News, the university says its academic changes reflect long-standing internal planning, not just compliance with new state requirements.
IPR: Trump administration withholds over $100 million in education funding from Indiana schools
By Indiana Public Radio / YesterdayThe Trump administration told states this week that it won’t be dispersing over $6 billion in federal education grants, according to reporting from NPR.