During the holidays, people tend to rediscover their kitchen tables by clearing off everything accumulated from the rest of the year in preparation to host family.
This makes it the perfect time to warm up the glue gun and sort through the buttons to make a few do-it-yourself centerpieces everyone can enjoy.
Here are three ideas from Pinterest if you need some inspiration:

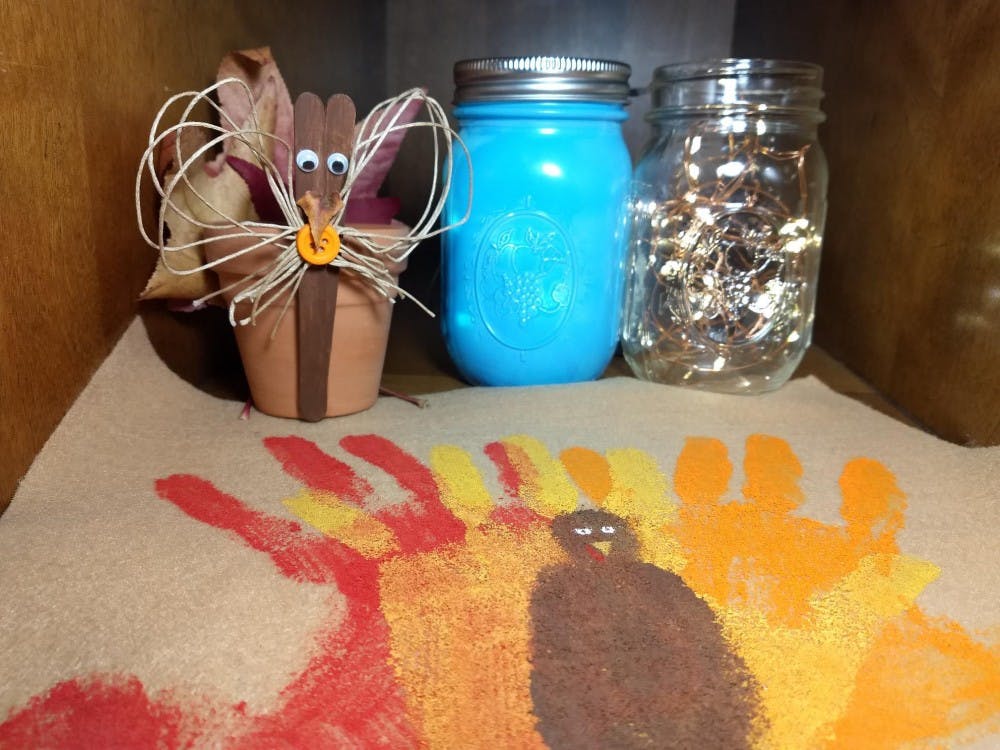
Leaf Mason Jar
Disclaimer: Not every DIY is as easy as it seems. In this case, the mason jar did not turn out as it was intended.
What you need:
A plain Ball jar
Spray paint or craft paint
Paint brushes
Real leaf or leaf cutout
Tape
Gloves
Possible mask, for spray paint
Directions:
- Remove the jar lid and set aside.
- Tape the leaf to the jar so it lays flat.
- Take the jar to a well ventilated room (outside is suggested) and place it on a surface that can be painted.
- Using the craft paint or spray paint, fully coat the jar in the color of your choice.
- Let the jar dry completely.
- Carefully remove the leaf from the jar.
- Using a paintbrush, fill in the edges of the leaf that did not turn out the way you wanted.
- Allow the jar to dry again.
- Fill with fairy lights or a candle.
- Admire your completed leaf jar.

Turkey Placemat
What you need:
Blank placemat - fabric squares or burlap
Acrylic Paint - Orange, Red, Yellow, Brown and White.
Paint brushes
Directions:
- Place fabric square on a table with the side you want to paint face up.
- Cover your left palm in orange paint with a paint brush. Sometimes it is easier to have someone else do it, but you can also put paint on a plate and dip your hand in it.
- Spread your fingers out evenly on your left and and line your thumb up parallel with the bottom of your piece of fabric.
- Leaving half an inch below the palm of your hand and the bottom of the placemat and an inch away from the edge, press your hand down flat on the right side of the placemat.
- Wash the orange paint off your left hand.
- Allow the paint to dry on the placemat.
- Paint your right palm with red paint like you did for step 2 with orange.
- Repeat steps 3-6, but make sure to put your right hand on the left side of the placemat. Your thumbs should face opposite directions.
- Cover your left palm with yellow paint.
- Repeat step 3-6 again, but this time, put your yellow hand print in the center of both the red and orange.
- Paint a dime sized circle in center of the hands just below the fingers in brown.
- Directly below that circle, paint an oval the size of two dimes across that goes to the bottom of your painted hands.
- Allow the paint to dry on the placemat.
- Paint two parallel lines at the bottom of the large oval in orange. Add two more lines branching off the end of the previous two to form the feet of the turkey.
- Add two white circles in the smaller brown oval for the turkey’s eyes.
- Allow the white paint to dry on the placemat.
- Paint two tiny brown circles within the turkey’s eyes for its pupils.
- Right underneath the eyes, paint a small upside down triangle for the nose in yellow.
- Finally, add a thick, curved red line below the yellow triangle to form the turkey’s gobbler. Let the whole placemat dry.
- Admire your completed turkey placemat.

Turkey Pot
What you need:
Crafting/Planting pot
Leaves (Real or artificial) - Maple shape recommended
Popsicle Sticks - recommended that they only exceed the pot size by less than two inches.
Brown acrylic paint
String
Googly Eyes
Button
Glue/Tape
Directions:
- Paint your popsicle sticks brown. Set them aside to dry.
- Gather three leaves together in a bunched fashion. Fan them out with their stems attached at the bottom to make the turkey’s tail.
- Glue or tape the stems of the leaves to the pot at the base on the back with the open part of the pot upward.
- Glue the stacked bottoms of the popsicle sticks to the front of the pot.
- Cut eight pieces of string, two pointer fingers long.
- Stack the two painted popsicle sticks, so the bottom of one is over the other, but the tops are fanned.
- Separate the strings into two groups of four.
- Take both sets of strings and criss-cross them to form a mock bow.
- Glue the bow on top of the glue popsicle sticks below the rim of the pot.
- Glue a button in the center of the mock bow.
- Cut a heart shape out of a leaf the same size as the button.
- Glue the leaf above the button.
- Glue a googly eye on each popsicle stick.
- Allow all glue to dry.
- Admire your completed turkey pot.
Contact Alyssa Cooper with comments at acooper6@bsu.edu.
Read More

9-1-1 What's Your Hot Take E12: Season 6 Recap
By Willow Emig and Sam Jasionowski / 10 minutes agoIn this episode of 9-1-1 What’s Your Hot Take, Sam and Willow discuss the events of season 5 of 9-1-1.

Prairie Creek Reservoir beach cleared for reopening
By Staff Reports / 1 hours agoThe City of Muncie announced the reopening of Prairie Creek Reservoir's beach via a press release July 3, successfully passing its water quality tests.

Record Parlor of Muncie aims to create good music and good vibes
By Kylee White / 3 hours agoRecord Parlor of Muncie hopes to provide good music while highlighting local artists.