Emily Griffis is a senior literature and creative writing major and writes DIYs for The Daily News. Her views do not necessarily agree with those of the newspaper or The Daily. Write to Emily at epgriffis@bsu.edu.
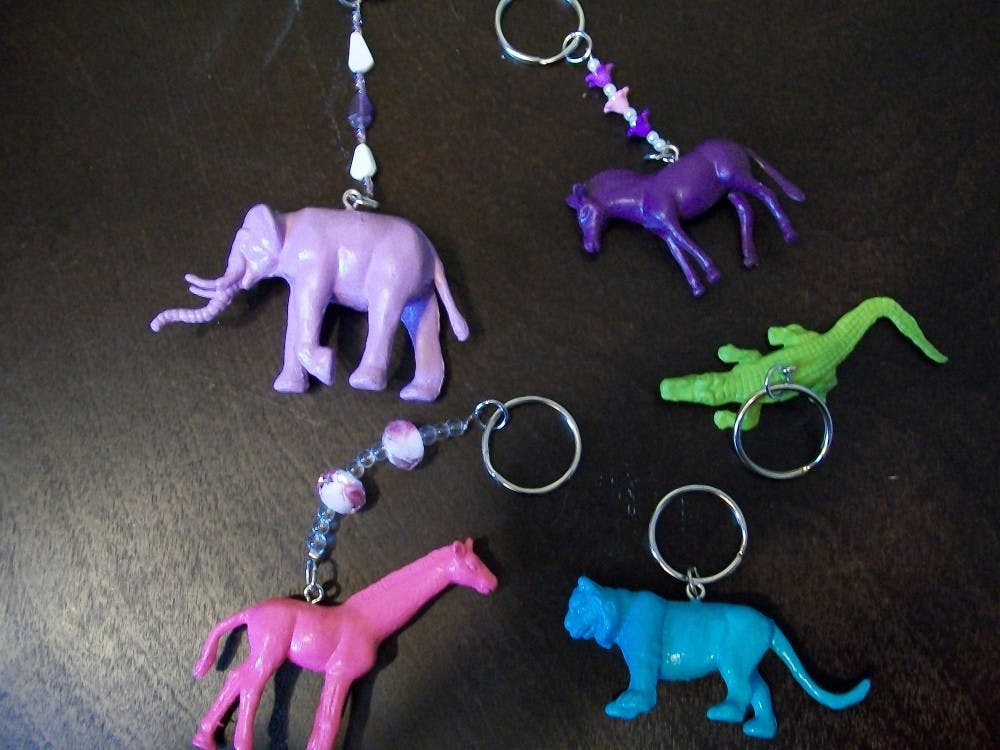
Have you ever walked past a shelf full of cute, plastic animals and wondered how you could justify buying some as an adult? No? Just me? Well whether you have or not, this animal keychain tutorial turns bland, plastic animal toys into cute, unique accessories.
|
Plastic animal figures Paint Paintbrush Liquid finish Eye hook screws Key rings Jump rings Optional supplies: Beads Elastic beading cord/wire Crimp beads Needle nose pliers Flat nose pliers |
Step 1:
Paint your plastic animals any color you want. Two or three coats might be necessary, especially if you pick light colors. Once your last coat is dry, apply a thin layer of liquid finish. I used Modge Podge Gloss, but any brand and type of finish will work. Let the animals dry for at least an hour.
Step 2:
Attach your eye hook screws. They twist easily into the plastic if you apply a little pressure in the beginning. I slipped my needle nose pliers through the hook and twisted the screw in that way, because I seemed to get a better grip with the pliers than with my fingers.
Step 3:
Add a jump ring to your hook. If you want to add a string of beads, continue to the optional steps. If not, attach a key ring to your jump ring, and you’re finished.
(Optional steps)
Step 4:
Cut a string of elastic beading cord or beading wire, whichever you chose to use, about two inches longer than the length you want your bead string. Slide a crimp bead onto the string and then slide the string through your jump ring attached to the animal. Loop the string around the jump ring and run it back through the crimp bead a second time. Pull the crimp bead tight up toward the jump ring and use your flat nose pliers to flatten the crimp bead, securing the string in place. Cut off the access string on the short end.
Step 5:
String on your beads in any order or pattern you want them. Feel free to make it as long, short or colorful as you want.
Step 6:
When you’re finished adding decorative beads, add another crimp bead followed by a jump ring. Loop the string around and back through the crimp bead, like you did in step four. Tighten it together and flatten the crimp bead with your flat nose pliers. Add a key ring to the second jump ring, and you’re finished.
Read More

Representation for all
By Jayden Vaughn / 10 hours agoThe LGBTQ+ community is finally getting the comprehensive on-screen representation that it deserves.
Bearcat pitching struggles lead to Muncie Central loss at Delta in Delaware County baseball clash
By David Moore / 23 hours agoAt the end of the evening, it was the Eagles who ended their four-game skid as Delta took the victory against the Bearcats 16-1 in five innings. Delta will be on the road for its next contest against Hoosier Heritage Conference rival Shelbyville April 23 at 6 p.m. Muncie Central will travel to Muncie Burris for its next matchup, also April 23 at 6 p.m.
With limited performance opportunities in Muncie, local drag artists bond through mutual support
By Hannah Amos and Ella Howell / YesterdayAfter spending the day cutting hair for those who find themselves in his salon chair, Chandler Skye heads out for the evening, but he doesn’t return straight home. Instead, he heads to the venue of his next show and finds himself onstage with a full face of makeup, a wig and an eye-catching outfit. In front of the audience, he is no longer known as Chandler Skye. In his shift from the hair salon to the stage, he becomes Aura Aurora, a well-known Muncie drag queen.