Emily Griffis is a senior literature and creative writing major and writes DIYs for The Daily News. Her views do not necessarily agree with those of the newspaper or The Daily. Write to Emily at epgriffis@bsu.edu.
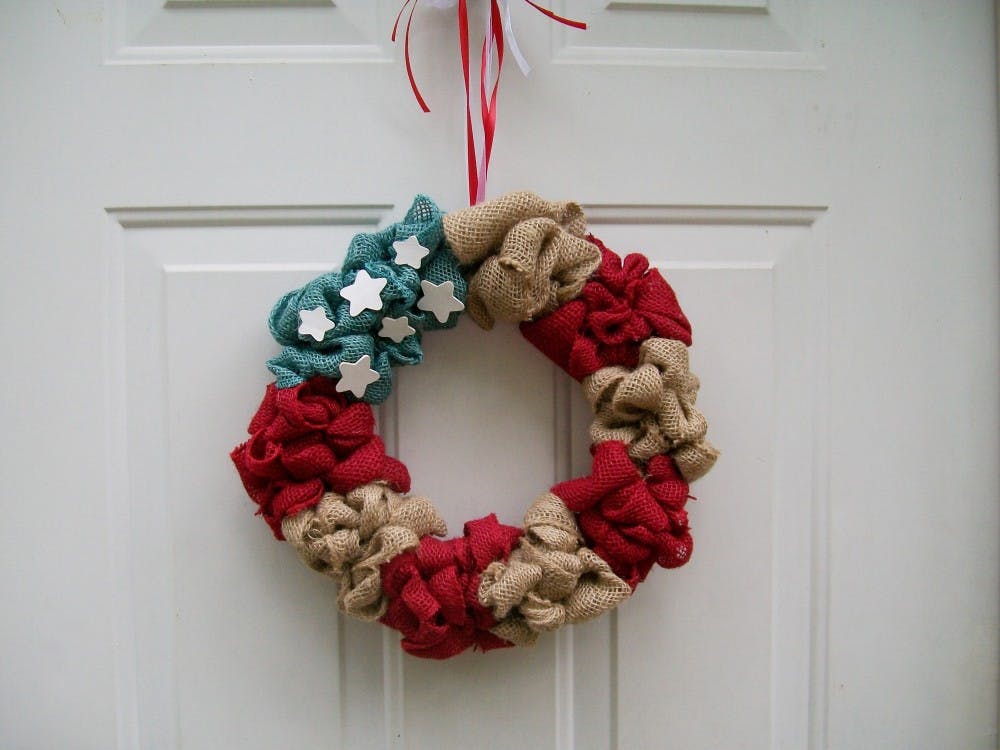
With Independence Day just around the corner, make your own door wreath to set the mood for the festivities.
What you’ll need:
- Wire wreath frame
- Burlap (regular, red and blue)
- Ribbon
- Wooden stars
- White paint
- Paint brush
- Glue gun
- Scissors
Step 1:
Using a paint brush, paint your wooden stars white. It’s important to do this first, so the paint can dry while you’re assembling the rest of the wreath. I used two different sizes, which are sold in bulk at craft stores like Hobby Lobby. You can also use plain white poster board as a more economical option, but it won’t hold up as well against weather.
Step 2:
Cut your brown and red burlap into strips a little more than two feet long. The amount you need depends on the number of sections you’ll add of each color; I used four of each color. Then cut a strip of blue burlap twice the size of the others, since it covers a larger area.
Step 3:
Take a strip of burlap and weave it through the wires of the frame. When you get to the end, turn around and weave it back in the other direction. Be as sloppy as you want, leaving bumps, pulling and tugging. This creates the full, gathered look of the wreath. Once you’ve used up your entire strip, repeat the process with the opposite color, continuing until you’ve used all of your strips of burlap. Tuck in the ends of each strip so they stay secure and hidden.
*Note: Spacing is important for the finished product to look even. My wire frame was split into five sections. I reserved one whole section on the top left for blue. The other four sections were split between red and brown.
Step 4:
When you’ve finished weaving all of the brown and red burlap, stop and attach ribbons to hang the wreath. I attached mine at the beginning of the first section I added, so that the blue was on the left of the ribbon. I tied mine in a bow at the top, but yours can be as simple or as elaborate as you’d like.
Step 5:
Weave the blue fabric through just like the other colors, tucking in the ends when you’re finished.
Step 6:
Lay out your stars how you want them to appear; I alternated the sizes on mine. Then use your glue gun to secure them firmly in place on the burlap, and your wreath is ready to display.
Read More

Top-seeded Cardinals’ postseason run ends with upset loss to Lindenwood
By Adam Altobella / 7 hours agoNo. 10 Ball State was upset by No. 18 Lindenwood in a five-set battle (25-20, 21-25, 25-23, 19-25, 11-15) on the Cardinals’ home court Thursday night. With how scarce at-large bids to the NCAA men’s volleyball tournament are, it is likely that the red and white’s 2024 campaign is over.
Fatal accident along McGalliard Road and Tillotson Avenue
By Staff Reports / 14 hours agoA police chase that began in neighboring Henry County the morning of April 18 ended in Muncie at the McGalliard Road and Tillotson Avenue intersection, according to a press release from the Muncie Police Department (MPD).